
Best Way to Delete Blank Rows in Excel
How to delete blank rows in Excel? This question, or rather the answer to this question may help you in a variety of scenarios. Say for instance you need to import your data into a pivot table and you need to remove the blank rows. Or say you even just want to filter your data, then knowing how to remove or delete the blank rows in Microsoft Excel will help you very much indeed.
To help you remember the important points to this tutorial, please take the opportunity to download the associated exercise file. You will find the exercise file on the link below.
How to delete blank rows in Excel - exercise file
The Excel Blank Row Problem
Here you can see my thorny problem. Below you will see a picture of my Excel worksheet. However, between the teams there are multiple blank rows that I need to remove.

The first thing I need to do is ensure that I have selected the entire range of data. To do this use the following keyboard shortcut:
Ctrl + End
This takes the cursor to the bottom right of the data that has been inputted. You can be sure that there will be no more data beyond the cursor.
Now, press Ctrl + Shift + Home to select the range.

Next you will want to press Ctrl + G on the keyboard to display the Goto Box.

Now click on Special.

Now, ensure that blanks are selected. This you can see above. Then click on OK.
Now for the final shortcut hold Ctrl + - this will display the Delete box.
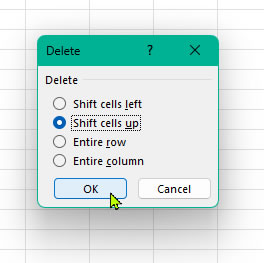
Ensure that Shift cells up is selected, then click OK.

As you can see from above, your blank rows have disappeared.
Why should you delete blank rows in Excel?
You really should know how to delete blank rows in Excel. This is because having blank rows in an Excel spreadsheet can cause a number of problems. For one, it can make the spreadsheet more difficult to read and navigate. This can be especially frustrating if you have a large and complex spreadsheet with many rows and columns. Blank rows can also make it more difficult to perform calculations and other data analysis tasks, as they can interfere with the formulas and functions that you are using.
Another problem leading to knowing how to delete blank rows in Excel, is that blank rows can lead to errors and incorrect calculations. If you have formulas that reference specific cells or ranges of cells, having blank rows in the middle of your data can cause those formulas to return incorrect results. This can be especially frustrating if you are working with large and complex datasets, as it can be difficult to identify the source of the error.
In addition to these practical issues, having blank rows in an Excel spreadsheet can also make it more difficult to collaborate with others. If you are sharing your spreadsheet with other people, they may have difficulty understanding the data if there are blank rows scattered throughout the document. This can lead to confusion and misunderstandings, and can make it difficult for everyone to work together effectively.
One of the best ways to avoid these problems is to avoid having blank rows in your Excel spreadsheet in the first place. This can be accomplished by properly organizing and formatting your data so that it is easy to read and understand. If you do end up with blank rows in your spreadsheet, you can remove them by using the method in this tutorial.
Also, if you've had a look at the free advice on the Microsoft Support website. You'll see the benefits of having all those pesky blank rows deleted.
Overall, having blank rows in an Excel spreadsheet can cause a number of problems, including making the spreadsheet more difficult to read and navigate, leading to errors and incorrect calculations, and making it harder to collaborate with others. To avoid these problems, it is best to avoid having blank rows in your spreadsheet and to properly organize and format your data.
Further Training
If you have enjoyed this Excel tutorial, please take the opportunity to view our further tutorials from the links below.
Alternatively, if you would like us to conduct an Excel training course for you or people within your company, then We will be very happy to accommodate your requirements.
TikTok Sneak Peak
Other Excel Videos Tutorials


