Computer Tutoring Logo
Est. 2002
Menu Button

How to create fillable forms in Adobe Acrobat?

Acrobat Pro - How to create a form?

This short video will show you to to create and distribute fillable forms in Adobe Acrobat Pro. This way you can control the input of the people you send the forms to. There are a wide variety of templates that are available so you should be able to find one that is suited to your needs.
  1. Open Adobe Acrobat
  2. Click Create - Create form.
  3. Choose From scratch or template then click Launch.
  4. Click on the Create New Form Tab at the top of the page.
  5. Click on the Category of template in the browse by category of the form you're looking for. I chose Education from the Categories list then Appointment form from the forms section to the right..
  6. Using the tools adjust the form to your requirements.
    1. To Change the Date to UK Format Click File - Language & Formatting.
    2. From the Form language drop down list at the top choose English (UK).
    3. Ensure you're looking at the right date format and pounds and pence. Everything we know and love about the UK.
  7. When finish click File - Save as PDF form.
  8. Save the form at a convenient location.
    (Ensure that you keep your forms organised - it's probably a good idea to keep them all in the same folder).
  9. Now back in Adobe Acrobat Pro Click Tools - Forms from the section to the right.
  10. Click Distribute. (Save if necessary)
  11. Choose how you want the form distributed. (Choose Email). Then click on Continue.
  12. Choose Save a local copy and manually save it later.
  13. Click on the Browse button and ensure the form is saved in your folder.
    (The form should have the suffix _distributed).
  14. Click Save then click Next.
  15. Click Finish.
  16. Open your Email software and attach the PDF form to an email. Now email the form to your recipients. (It's the file with the suffix "_distributed").
  17. Your email recipient will fill out the form, then click on the submit form button in the top right corner.
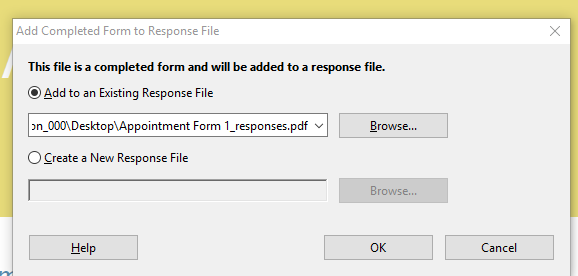
  18. When you get the response files double click on them in your InBox. You'll see the following box:

    Add Completed Form to Response File Acrobat dialogue box
  19. Ensure that the Add to an Existing Response File text box is pointing to the correct response file then click OK.
    (You'll know it's the correct response file by clicking on the browse button and selecting the response file that is in the folder your created.)
  20. Click Forms - Track to start tracking responses.

To see how to collect files in a response file please see video:

How to collect data from PDF forms


Computer Tutoring takes your privacy seriously and collects essential information such as your name, email, and course preferences to facilitate our services. Additionally, we use cookies to personalise your experience and for Google Ads personalisation, which helps us deliver more relevant advertising to you.

We do not share your personal data, except for specific use-cases like payment processing via PayPal and sending you updates via Mailchimp, if you've opted in for those services. Our site may also use Google Analytics to improve user experience and features links to other websites. Please be aware that Google's Privacy Policy may differ from ours.

We do not store your credit/debit card details. You have the right to access, amend, or request deletion of your personal data by contacting us at info@computertutoring.co.uk.

By using our website, you consent to our use of cookies for the purposes outlined above.

For more details, please read our full Privacy Policy.